This article contains affiliate links. If you book through them, I earn a small commission at no extra cost to you.
In This Article
- Blue Pond, Biei
- Farm Tomita, Nakafurano
- Otaru Canal
- Red-Crowned Cranes at Tsurui
- Sapporo Snow Festival
- Drift Ice off Abashiri
- Daisetsuzan in Autumn
- Lake Mashu
- Hakodate Night View from Mount Hakodate
- Cape Kamui, Shakotan Peninsula
- Spots That Are Overhyped (In My Opinion)
- Gear and Practical Tips
- Planning Your Photography Trip
I spent three weeks driving around Hokkaido with a camera bag that was way too heavy and a vague plan that kept changing. Some spots blew me away. Others? Honestly, I stood there wondering what all the fuss was about. So here is my honest take on where to actually point your camera in Hokkaido, based on real experience rather than Instagram hype.
Hokkaido is massive. Like, genuinely huge — it is roughly the size of Austria, and most of the best photography spots are spread across the eastern and central parts of the island. You cannot hit them all in a long weekend. Plan for at least 10 days if you want to do it properly, and rent a car. Trains will not get you to half of these places.
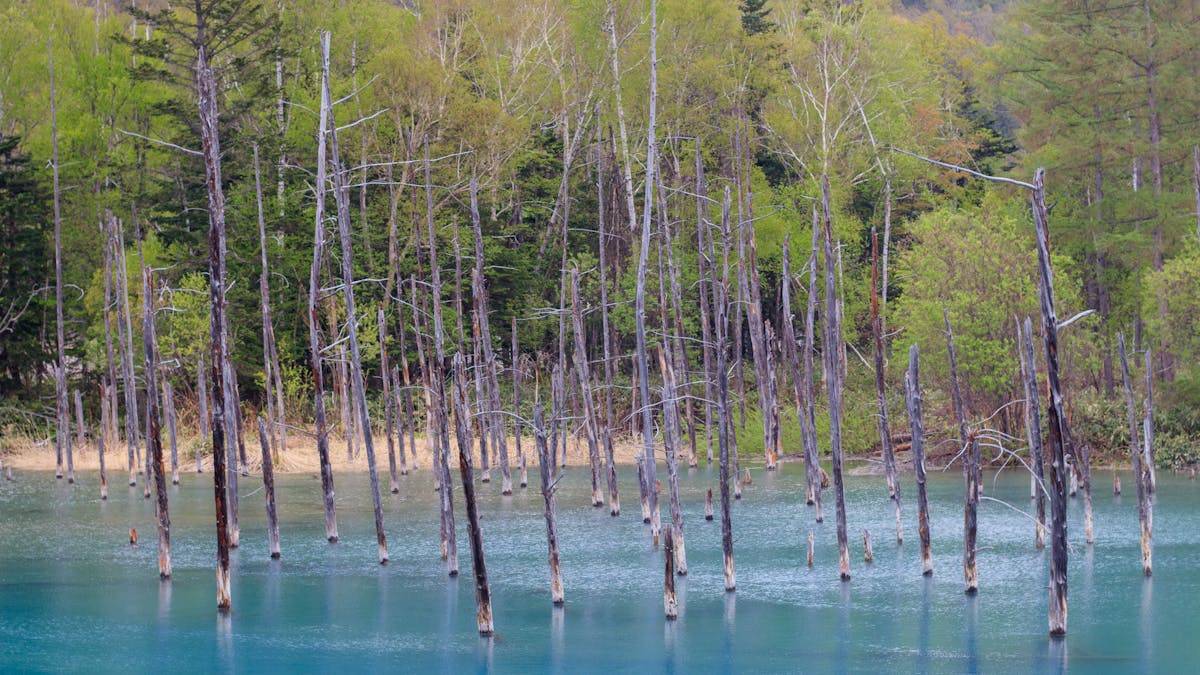
Blue Pond, Biei
You have probably seen this one already. The unnaturally blue water with dead birch trees sticking out of it — it went viral years ago and Apple even used it as a default wallpaper. The thing is, Blue Pond (Shirogane Blue Pond) genuinely looks like that. It is not a filter. The colour comes from colloidal aluminium hydroxide particles in the water that scatter light, and the effect changes dramatically with the seasons and weather.

Best time to shoot: Early morning, any season. Summer gives you the classic turquoise with green foliage. Autumn adds warm tones from the surrounding trees. Winter — when they light the pond up at night — is spectacular but absolutely freezing. The light-up runs roughly November through April.
Practical stuff: Get there before 7am in summer. By 9am the parking lot fills up and you will have people walking through every shot. There is a viewing platform but the best angles are actually from the path along the left side of the pond. Tripod is useful for the winter light-up but you can manage handheld at higher ISOs. The pond is about 20 minutes by car from central Biei, and it is free to visit.
If you are already in the Furano-Biei area, combine Blue Pond with the patchwork hills — those rolling farmlands with strips of different crops make for great aerial-style compositions even from ground level.
Farm Tomita, Nakafurano
This is the lavender shot. The one with rows of purple stretching toward distant hills. Farm Tomita has been growing lavender since 1958 and it has become the single most-photographed spot in the Furano region. For good reason — the scale of the flower fields is something you cannot really appreciate until you are standing there.
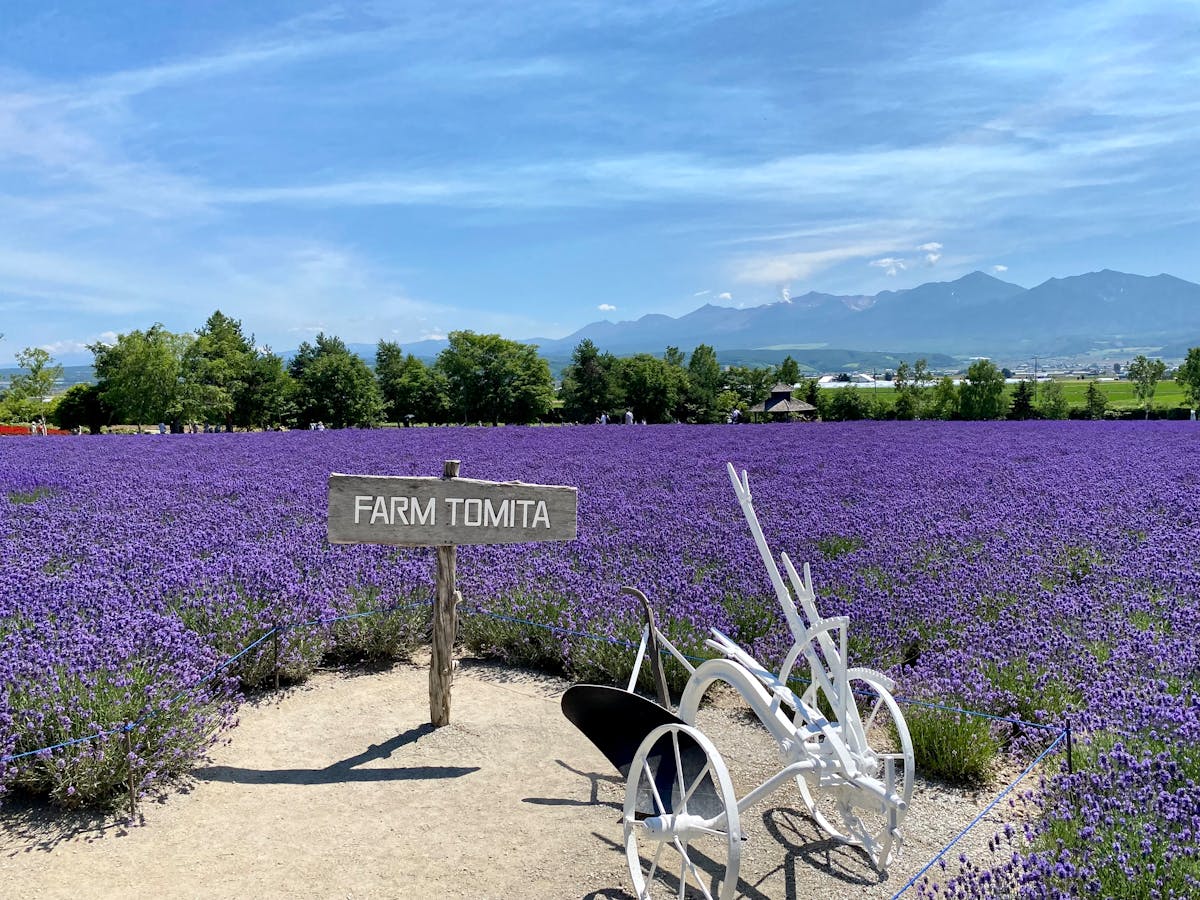
Best time to shoot: Mid-July is peak lavender. The farm also has other flower varieties that bloom at different times — poppies, marigolds, salvia — creating those colourful striped fields. Early morning light (before 8am) gives warm side-lighting across the rows. Midday is flat and harsh.
The honest truth: Farm Tomita is packed. Like, absolutely heaving with tour buses from mid-morning onward. It is free to enter, which is great, but that means there is nothing keeping the crowds down. If you want people-free shots, sunrise is your only option. Also, the lavender season is painfully short — maybe three weeks at best. Miss it by a few days and the fields look scraggly.
While you are in the area, the Furano-Biei guide covers plenty of other spots worth shooting. The patchwork hills around Biei are less crowded and equally photogenic.
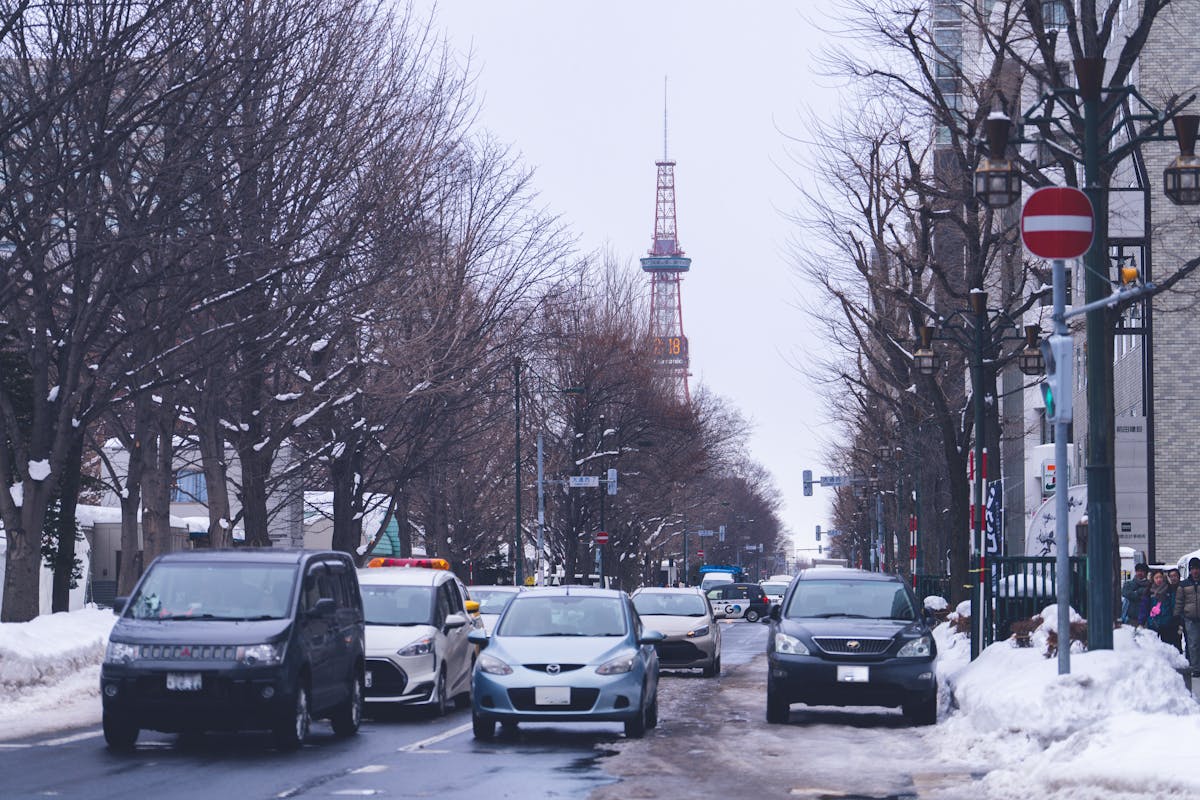
Otaru Canal
Otaru’s canal is one of those rare spots that actually looks better in person than in photos. The old stone warehouses, gas lamps, and the water reflecting everything — it is almost too picturesque. In winter, with snow piled on every surface and the warm lamplight cutting through the cold air, it becomes something really special.
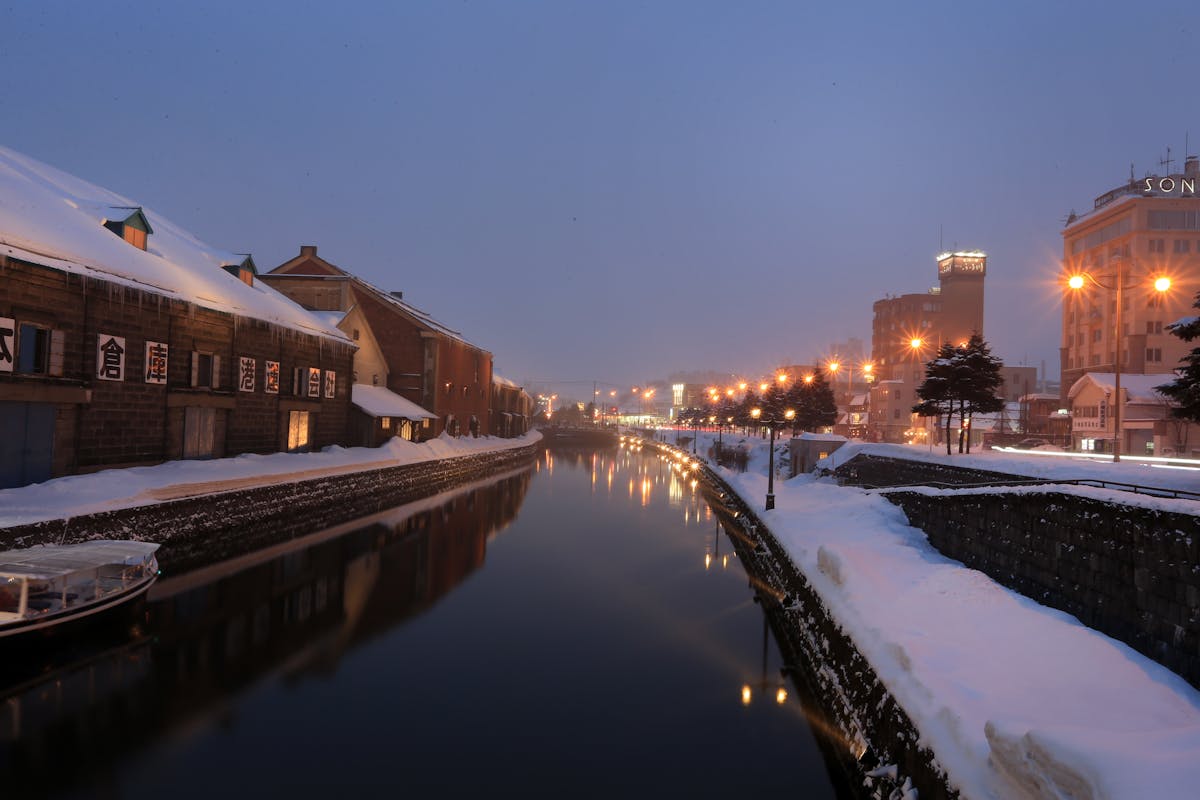
Best time to shoot: Blue hour. That 20-minute window just after sunset when the sky still has colour but the lamps are already on. This is when every good Otaru Canal photo is taken. In winter, that is around 4:30-5pm. Summer blue hour is closer to 7:30pm.
What most people get wrong: Everyone shoots from the same bridge. The most famous angle is from the Asakusa Bridge looking south, but walk further along the canal toward the warehouses and you will find compositions with fewer people in them. The canal is short — maybe 1.1km — so you can walk the whole thing in 20 minutes and scout angles before committing.
Otaru is an easy day trip from Sapporo by train (about 30 minutes). If you are staying overnight, you get the empty early morning canal to yourself. The winter months are unquestionably the best time for photography here.
Red-Crowned Cranes at Tsurui
This is the shot that brings serious wildlife photographers to Hokkaido. The tancho (red-crowned crane) is one of the rarest cranes on earth, and Tsurui-Ito Tancho Sanctuary in eastern Hokkaido is the best place to photograph them. The cranes gather here from November through March, and in February and March they perform their mating dances — leaping, bowing, tossing snow — and it is genuinely one of the most beautiful things I have ever pointed a camera at.
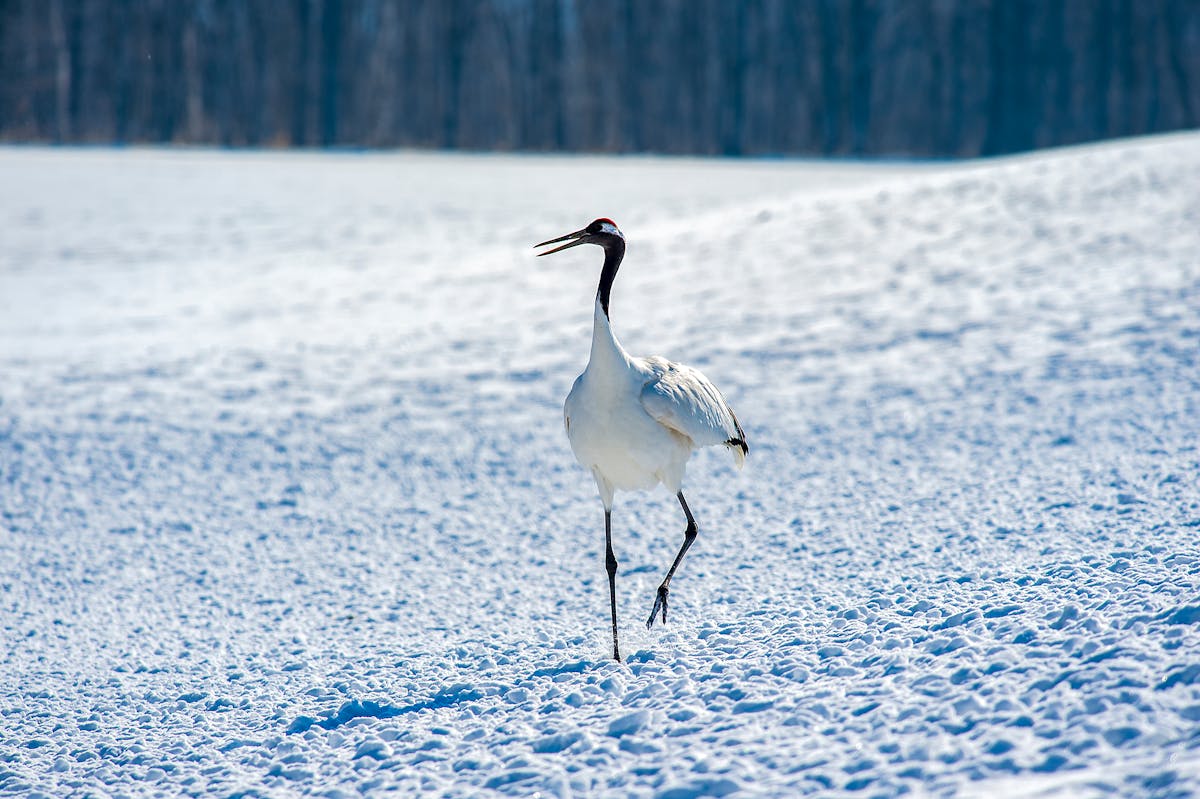
The gear situation: Unlike most wildlife photography, you do not actually need a massive telephoto here. The cranes at Tsurui are fed at the sanctuary and are remarkably comfortable around people. I got usable shots at 200mm, and local photographers I spoke to said anything from 100mm to 400mm works depending on what you want. For tight portraits, 300-400mm is ideal. For environmental shots with the snowy landscape, 70-200mm is perfect.
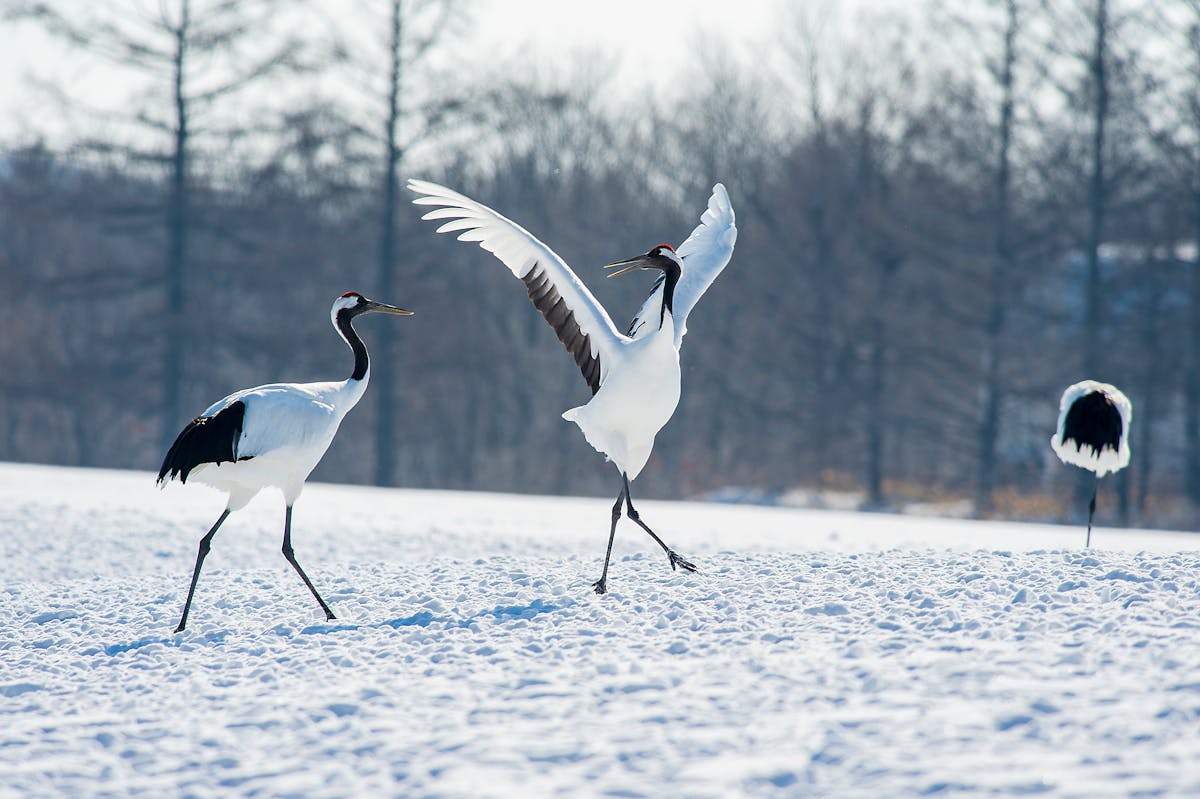
Practical warnings: It is brutally cold. I am talking minus 20 Celsius on a bad morning. Your camera batteries will drain fast in those temperatures — bring at least two spares and keep them in your jacket pocket close to your body. A local photographer told me she goes through three batteries on a single morning session. SD cards are easy to find at convenience stores if you run out, but specialty cards (XQD, CFexpress) are only available at electronics shops in Sapporo.
The cranes are part of the eastern Hokkaido circuit. If you are out that way, combine Tsurui with Lake Mashu and Abashiri for a solid 3-4 day photography trip. The Hokkaido wildlife guide has more details on other species to watch for.
Sapporo Snow Festival
Every February, Sapporo’s Odori Park fills with massive ice and snow sculptures, some of them three stories tall. It is the biggest winter festival in Japan and the scale is hard to believe until you see it. From a photography perspective, the evening light-up is the main event — the sculptures are lit with coloured LEDs and the contrast against the dark sky makes for dramatic images.
Best approach: Walk the full length of Odori Park first without stopping. See all the sculptures, pick the three or four that photograph best, then go back and commit time to each. The light-up runs until 10pm and the crowds thin out significantly after 8:30pm. A wide-angle lens (16-35mm or equivalent) is essential for the big sculptures. A fast prime (50mm f/1.8 or similar) works well for detail shots and the food stalls.
What to skip: The Susukino ice sculpture site is smaller and less impressive than Odori. If you are short on time, stick to the main park. The Tsudome site has snow slides and family activities but is not great for photography.
Check the full Sapporo Snow Festival guide for dates, logistics, and food recommendations. Hotels in Sapporo book out months in advance for the festival, so plan early.
Drift Ice off Abashiri
Every winter, sheets of sea ice drift down from the Sea of Okhotsk and pile up along Hokkaido’s northeastern coast. Abashiri is the most accessible place to see (and photograph) this drift ice, and you can take icebreaker cruises that push straight through it. The experience of standing on a ship surrounded by nothing but cracked white ice to the horizon is surreal.
Best time: Late January through early March. The ice coverage varies wildly year to year — some seasons it is thick and dramatic, others it barely shows up. Check the drift ice forecast online before planning a trip specifically for this. February tends to be the most reliable month.
Shooting tips: From the icebreaker, you want a medium zoom (24-70mm or similar). The ice patterns and textures are the main subject. Bring a polariser to cut glare off the ice surface. If you are lucky, you might spot Steller’s sea eagles sitting on the ice floes — and for those you will want a 200-400mm lens at minimum. The eagles are massive and dramatic but they do not come close to the ship.
Abashiri also has the Okhotsk Sea Ice Museum if the weather does not cooperate. The town itself is small and quiet but has a few decent izakayas for warming up after a cold morning on the water.
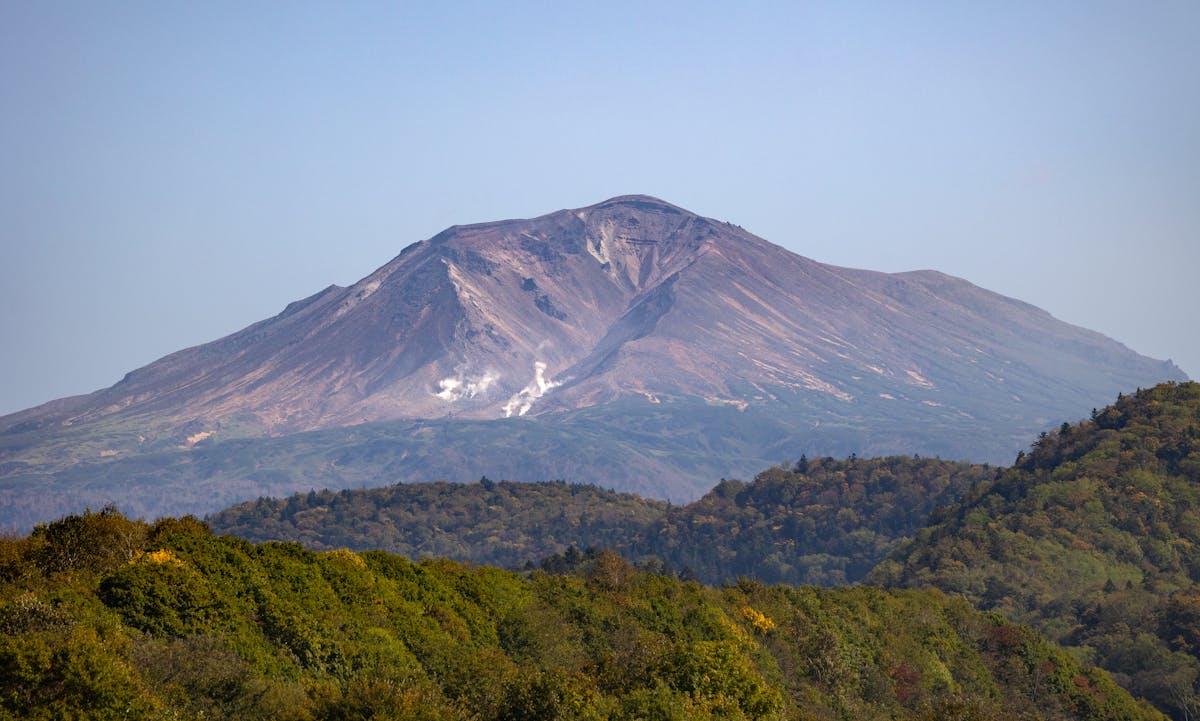
Daisetsuzan in Autumn
Daisetsuzan National Park is Japan’s largest national park and it gets the first autumn foliage in the entire country. By mid-September — while the rest of Japan is still in summer mode — the slopes of Asahi-Dake and the surrounding peaks are already turning red, orange, and gold. For landscape photographers, this is the big one.
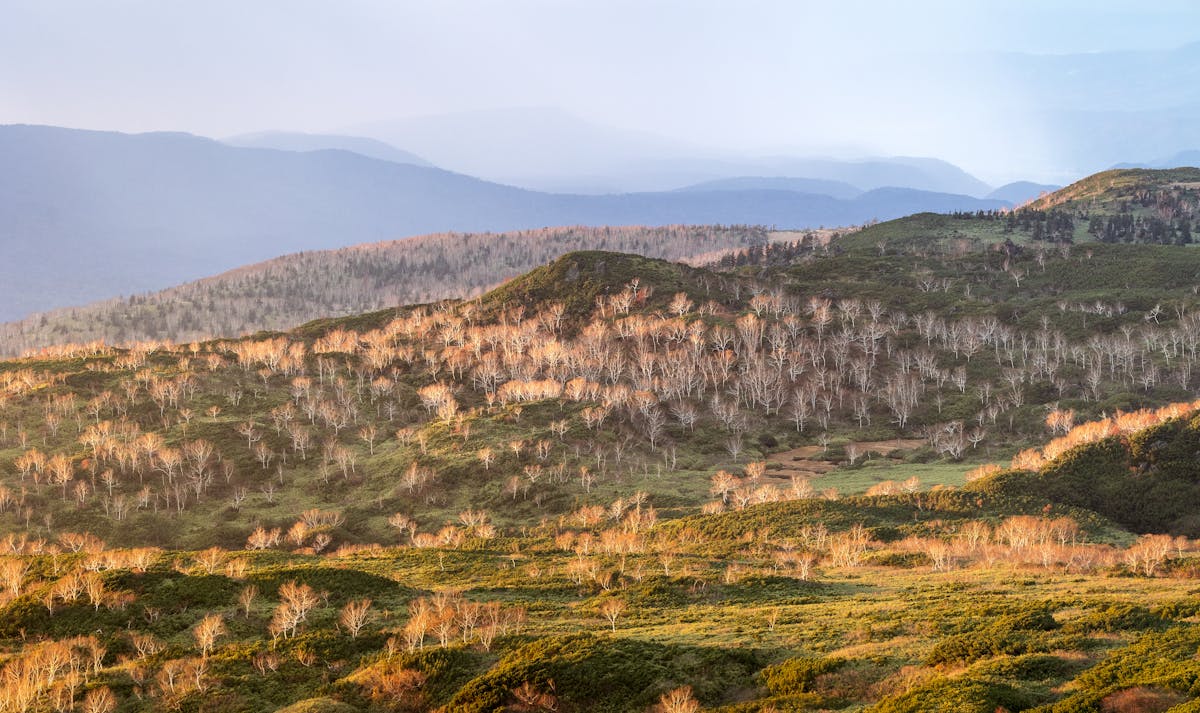
How to shoot it: Take the Asahi-Dake Ropeway up to 1,600 metres. From the top station, there is a 1-2 hour loop trail through volcanic terrain with steaming vents and ponds surrounded by autumn colour. The contrast between the barren volcanic rock and the blazing red shrubs is incredibly photogenic. Wider lenses work best here — 16-35mm gets the grand vistas, and a 24-70mm covers most situations.
Timing is everything: Peak colour lasts about 10 days at the summit, roughly September 15-25. Lower elevations hold colour into early October. The window is tight and weather-dependent — a single typhoon can strip the colour overnight. Check the Hokkaido autumn guide for foliage forecasts.
Daisetsuzan is also brilliant for hiking. The multi-day traverse from Asahi-Dake to Tokachi-Dake is one of Japan’s premier mountain routes, though it requires proper backcountry gear and experience.
Lake Mashu
Lake Mashu sits in a volcanic caldera in eastern Hokkaido and has some of the clearest water in the world. On a good day, the visibility is extraordinary — you can see deep into the blue water, and the crater walls rising steeply on all sides create a dramatic natural amphitheatre. On a bad day, which is most days, it is completely hidden by fog.
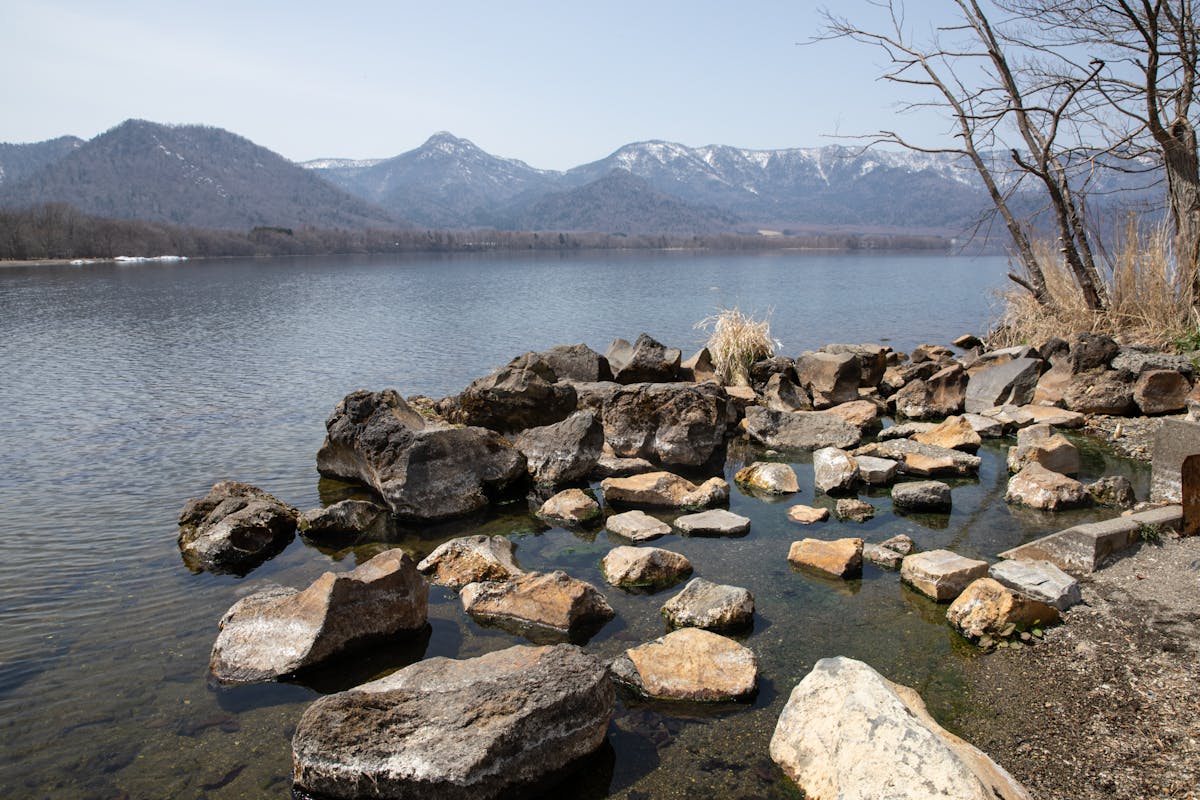
The fog problem: Mashu is nicknamed “Lake of Fog” and that is not marketing — it is genuinely fog-bound more often than not, especially in summer. Early morning (before 7am) and autumn tend to have the best visibility. Some photographers visit two or three times before getting a clear view. Do not plan your entire trip around it unless you have flexible dates.
There are three viewpoints. Viewpoint 1 is the most popular and accessible. Viewpoint 3 is less crowded and gives a slightly different angle. Viewpoint 2 has been closed for years. The viewpoints are up on the crater rim, so you are shooting down into the lake — bring a longer focal length (70-200mm) if you want to compress the depth and emphasise the water colour.
Lake Mashu is part of the eastern Hokkaido circuit. Nearby Lake Kussharo is worth a stop too, especially in winter when whooper swans gather at the hot spring shores.
Hakodate Night View from Mount Hakodate
The night view from Mount Hakodate has been ranked among the top three night views in the world for years (along with Hong Kong and Naples, though these lists are arbitrary). The city spreads out on a narrow strip of land between two bays, and from 334 metres up, the shape of the city lights flanked by dark water on both sides is genuinely striking.
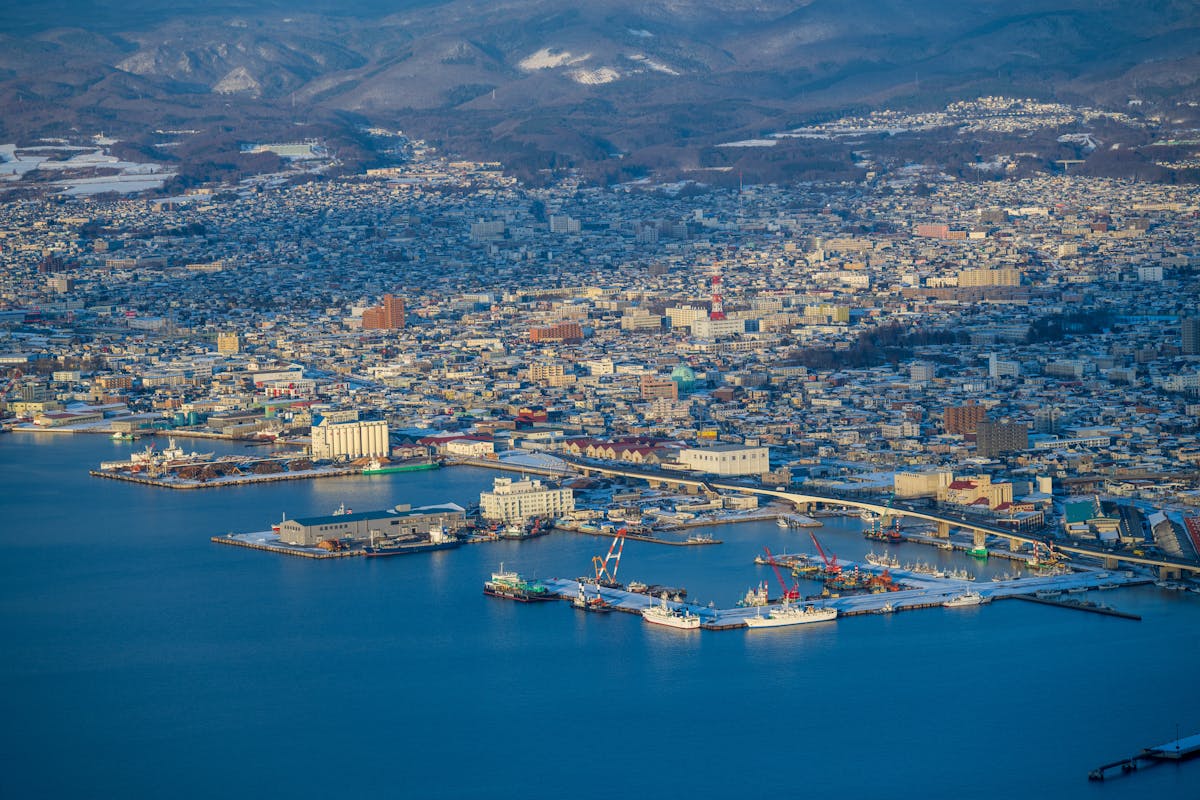
How to get the shot: Take the ropeway up (about 3 minutes, roughly ¥1,800 return). Arrive at least 30 minutes before sunset to claim a spot at the observation deck railing — it gets absurdly crowded, especially in summer. Blue hour is the sweet spot. Tripod is mandatory unless you have excellent stabilisation. A 24-70mm covers most compositions, though a 70-200mm lets you isolate different parts of the cityscape.
What nobody tells you: The observation deck has thick glass panels and the reflection from people’s phones behind you will ruin long exposures. Position yourself as close to the glass as possible, or bring a rubber lens hood that presses flat against it. Some photographers use a dark cloth draped over their camera to block reflections. Also, the best clear evenings are in winter — summer often has haze.
The Hakodate travel guide covers the morning market, historic areas, and the excellent seafood that makes spending a night or two here worthwhile.
Cape Kamui, Shakotan Peninsula
This one does not appear in most photography guides and that is part of why I am including it. The Shakotan Peninsula juts out into the Sea of Japan west of Otaru, and Cape Kamui at its tip offers raw, dramatic coastal scenery — sheer cliffs, deep blue water (locals call it “Shakotan Blue”), and a lighthouse perched on the edge of everything. It is nothing like the gentle Hokkaido countryside. It feels wild.
Best time: Summer for the intense blue water and clear skies. The cape is accessible from late April through October (the road closes in winter). Late afternoon light hits the cliffs beautifully from the west. A wide-angle lens captures the cliff drama; bring a telephoto too for the rock formations in the water below.
Getting there: It is about 2.5 hours from Sapporo by car and there is no public transport to the cape itself. The drive along the coast through Shakotan is stunning — allow extra time to stop. The final walk to the lighthouse takes about 20 minutes along a narrow path. Watch for sea eagles in the area if you have a long lens.
You can combine Shakotan with an Otaru visit since they are on the same coast. Just be warned that Shakotan adds significant driving time.
Spots That Are Overhyped (In My Opinion)
Not everything in Hokkaido lives up to the Instagram hype. A few honest takes:
Shikisai-no-Oka flower gardens — Pretty, yes, but it is a commercial flower park that feels manufactured compared to Farm Tomita. The admission fee and the theme park atmosphere take away from the natural feel. If you have already done Tomita, skip this one.
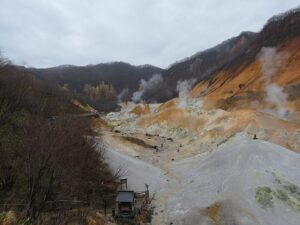
Noboribetsu Jigokudani (Hell Valley) — Dramatic name, and the steaming volcanic vents are genuinely otherworldly. But it is a short boardwalk, the light is usually flat because of the steam, and the viewing angles are limited. Worth 30 minutes if you are driving past. Not worth a special trip just for photos.
Lake Toya — Beautiful lake, but not particularly photogenic compared to Mashu or Kussharo. The surrounding development takes away from the natural feel. The volcanic caldera island in the middle is interesting but hard to photograph without a drone or a boat.
Gear and Practical Tips
After three weeks shooting around Hokkaido, here is what I actually used and what I wish I had known:
The cold kills batteries. This came up in every conversation I had with local photographers. In winter, lithium-ion batteries lose power dramatically in sub-zero temperatures. Keep spares in an inside pocket against your body and rotate them. One photographer in Tsurui told me she goes through three batteries in a single morning session. This is not an exaggeration.
SD cards are everywhere. Every convenience store in Hokkaido sells SD cards. They are not fast cards, but they will get you through in an emergency. Specialty formats (XQD, CFexpress) are only available at electronics stores in Sapporo — BIC Camera or Yodobashi are your best bets.
A tripod is optional, mostly. For the Otaru Canal blue hour shots, Hakodate night view, and winter Blue Pond light-up, you will want one. For everything else, modern cameras with good stabilisation can handle it. If you are travelling by train and bus, the weight and bulk of a tripod might not be worth it. A small tabletop tripod or gorillapod covers most situations.
Renting a car changes everything. Half the spots on this list are not reachable by public transport, or reachable only with painful bus connections. A rental car costs roughly ¥5,000-8,000 per day and makes the eastern Hokkaido circuit possible. Book early in summer — cars sell out.
Wide-angle is more useful than telephoto. Unless you are specifically going for wildlife (cranes, eagles), the landscapes in Hokkaido call for wide-angle more than anything. A 16-35mm and a 70-200mm covers about 90% of what you will want to shoot. Add a fast 50mm for low light and you are set.
Planning Your Photography Trip
If I had to plan one ideal photography trip to Hokkaido, I would do 10-12 days in late February. You get the cranes at peak mating dance season, drift ice, Snow Festival (if the timing works), Otaru Canal in snow, and the Blue Pond winter light-up. Winter Hokkaido is cold and sometimes brutal, but it is when the island is most photogenic.
For a summer trip, mid-July gives you lavender at Farm Tomita plus long daylight hours for exploring. But summer Hokkaido is also peak tourist season, so expect crowds at the popular spots.
Autumn is the sweet spot if you can time it right — mid-September for Daisetsuzan, then working your way down to lower elevations through early October. Fewer tourists, comfortable temperatures, and the most dramatic colours.
Whatever season you pick, there is no shortage of things to do between photography sessions. And honestly, some of the best shots come from the unplanned stops — the roadside shrine nobody visits, the fishing port at dawn, the random onsen town where steam rises from manhole covers. Keep your camera accessible and be ready to pull over.